Part of our organising documentation.
LRUG Video Editing Notes
These notes refer to using iMovie and were made using 10.1.14 on macOS Catalina 10.15.5. It might be different for versions of the OS or software.
Project Settings
Name it:
LRUG month year - speaker name - talk title
Assets
- the lrug logo
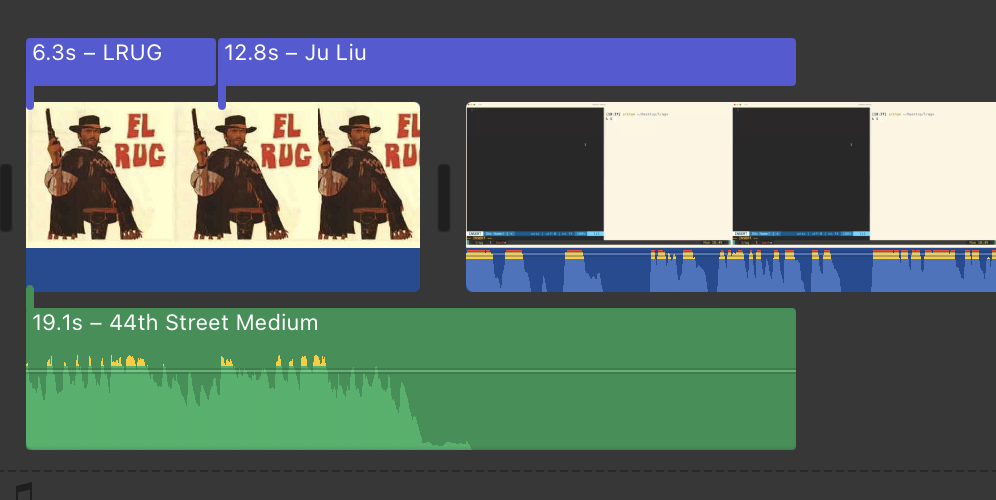
- “44th Street medium” jingle - available in the “Audio” tab, there’s 3 a short, medium, and long version. We want the medium one that’s 19 seconds long
- “Gradient black” title - available in the “Titles” tab
- “Futura Medium” font - it’s what the title uses by default
- Meeting video - get this from zoom or whatever
Intro
- Video Track - starting from 0
13.0seconds of the LRUG logo - make sure the cropping is set to “fit”- the main video of the talk, starting after the logo
- Audio Track - starting from 0
19.1seconds of “44th street medium” jingle as audio layer - this is the actual length of this jingle, no need to stretch or cut- the main audio of the talk, starting after the logo
Yes! This means the jingle audio layers over the talk audio. The jingle has started to fade out by then though, so usually this is ok - you can pick the exact start of the main talk video to compensate for it if you need to though.
- Text track - starting from 0
6.3seconds of the “gradient black” title- Main: LRUG
- Subtitle:
month year
12.8seconds of the “gradient black” title- Main:
name of the speaker - Subtitle:
title of talk- If the talk has a very long title, you might need to do something special Yes, This means the text layers goes the main talk video, usually this is fine.
- Main:
Line this up so that the logo, jingle, and 6 second title are at the start of the timeline, and the 12 second title comes immediately after the 6 second one. If you get this right, the jingle and titles should last longer than the logo, but they should end at the exact same time. The logo should disappear just as the jingle does it’s final flourish and starts to taper off.
In iMovie, if you line everything up correctly, it will look something like this:
Main content
- Drop the main video of the meeting in here so the title and jingle overlap by about 6s.
- Trim the main video to the start of the speakers talk, which might not be when they start to speak, use your judgement. So far I’ve chosen not to include intro or applause.
- Trim the main video to stop at what feels like the end of the speakers talk, usually just before the applause or host saying “thanks”
- Improve the audio:
-
Boost volume:
Either:
On the main content drag the line on the audio waveform up to the top of the blue waveform section to boost the audio to at least 200%, if not all the way up to 400%.
or:
Select the main content clip and press the
volumeicon in the preview window then drag the slider next to theAutoandspeakericons to at least 200%, if not all the way up to 400%. - Auto levels: select the main content clip and press the
volumeicon in the preview window then press theAutobutton to average out the levels (helps with a quiet speaker) - Reduce background noise: select the main content clip and press the
noise reduction and equalizericon in the preview window, then check theReduce background noisecheckbox and set the slider to at least 50%. - Equalizer: select the main content clip and press the
noise reduction and equalizericon in the preview window, then choose “Voice enhance” from theEqualizerdrop down. Listen to some of the audio - if it sounds weird, fiddle with the volume boost to avoid clipping and see what works.
-
- Check for anything you need to cut - technical hitches, interlopers annotating the screen, unexpected pet or family interruptions, etc… It might be useful to introduce a freeze-frame and stretch it to cover problems in the video if the audio is still usable. You can split the audio from the main content if needs be to achieve this.
Outro
- Video Track
- 13 seconds of the LRUG logo - starting immediately after the end of the main talk video
- Audio track
-
19.1seconds of the “44th street medium” jingle - to start ~6.1s before the end of the main talk audio.Positioning this is annoying, as you have to position the start, not the end. If “snapping” is on, put the playhead right at the end of the logo and slide the jingle audio along until the playhead flashes to indicate it’s snapped. We don’t want the audio lasting longer than the logo.
-
- Text track
13.0seconds of the “gradient black” title - starting immediately after the end of the main talk video - to overlay entirely on top of the logo- Main: “LRUG -
month year” - Subtitle: thanks to a sponsor or blank
- Main: “LRUG -
We want to fade up the jingle and fade down the main content so that the jingle, which starts very loud, won’t drown out the last few words. Equally though, we don’t want the last few seconds of the main content video to be as abrupt as all that. Sometimes you have to finesse the fade down and the trim point.
- Fade up the jingle by pulling the audio line right from the start - usually fade up for the full 6 seconds of overlap
- Fade down the main content by pulling the audio line left from the end - usually fade down for about 5 seconds of the overlap
In iMovie, if you line everything up correctly, it will look something like this:

Export
- Choose “File” from the “Share” menu
- Description should be fine if you’ve named the project as above (e.g. it’s “This video is about
title”) - Resolution:
720p - Quality:
custom(drag the slider to the lowest setting2 Mbps) - Compress:
faster
Note: the resolution, quality, and compress options in the iMovie share UI are hidden by a non-obvious scroll window.
The expected sizes of the output are always way out. A 25 minute talk usually comes out about 250Mb or so, but it’ll estimate at ~700Mb. If that’s not the case then we will have to compress it further with ffmpeg.
- Install
ffmpegviabrew- the default homebrew version offfmpeginstalls all possible codecs and dependencies so this might take a while, but it does mean it’s fully featured and can do everything - Compress the output from iMovie further
ffmpeg -i input.mp4 -b:v 750k output.mp4- the-b 750kpart tells it to restrict data to ~750kbps. This should give you a further 50% reduction thereabouts from the iMovie export
If the video is still more than say 300Mb you’ll want to explore further options to tradeoff quality for size.
Upload
- Rename file to
speaker-name-title-lrug-mmm-yyyy.mp4- all lower case, remove extra punctuation, etc.. Note: unlike the rest of this guide, we usemmmhere and want the 3-letter abbreviation of the month, else where in this guide we usemmmmand want the full month name. scpto lrug.org:sites/lrug.org/assets/videos/yyyy/mmmm/-
Add to relevant
yyyy.ymlindata/coveragein the lrug.org repo as:mmmm: title-parameterised: - type: video url: http://assets.lrug.org/videos/yyyy/mmmm/filename.mp4 title: 'LRUG mmmm yyyy - speaker name - talk title' -
Add coverage tag to relevant meeting page the lrug.org repo:
{::coverage year="yyyy" month="mmmm" talk="title-parameterised" /}